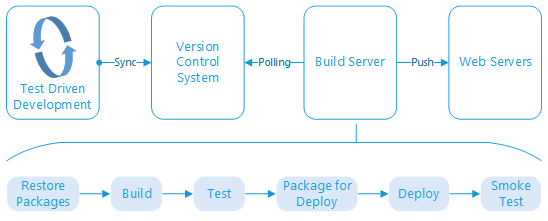
“Project T” is a temporary codename for a web application that I have begun developing off hours. Having just read The Phoenix Project, and now reading Continuous Delivery, I realized that the first step in creating a minimum viable product is to have a minimum viable process for continuous delivery, with no financial budget for that process. The solution combines a Microsoft Azure VM, GitHub, TeamCity, NuGet, Bower, Grunt, MSDeploy, and SoapUI. The result is this: as soon as I commit code to the version control system, it starts an automated chain reaction that ends with a complete install on my integration test servers.
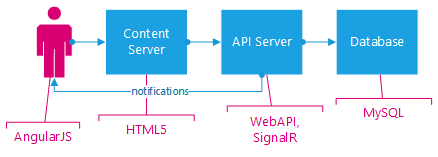
Project T’s essential requirements are the same as any web application: deliver some content and allow users to manipulate data. The content might be delivered through the client’s own web site, which I have no direct access to. As I was already leaning toward using the JavaScript MVVM (namely, AngularJS) and RESTful service approach, I have opted to architect the system with two web servers in mind. The content server would provide only the content files, and would have no restrictions on hosting platform. The API Server, on the other hand, will run ASP.NET Web API.
I considered using Node.JS, but the project’s desired timeline pushes me back to the familiar territory of C#. The backend database is flexible. A NoSQL solution could be appropriate, but I believe the data will be most portable (and thus useful to the client) stored in a SQL solution, which could be Microsoft SQL Server or MySQL. If push notifications are required, then I will likely stick with Microsoft’s SignalR hosted on the API server.
Push Button Deploy
Configuring the build server to run all of the steps shown above has been an exciting adventure, and I’m not fully there yet. Setting up Visual Studio locally, and connecting to GitHub for version control, was trivial. From there, getting to the push-button deployment took me about two days of effort, with a good deal of experimentation and blog reading. I did not try to carefully document every step along the way, so for the most part I will only be sketching out the steps and final state, rather than providing details.
The most important pieces I am missing are: automatic rollback if the smoke test fails, and the ability to deploy to anything other than my integration testing environment. Naturally I have duplicate systems for acceptance testing and for production, with each system on a different subdomain of my primary hosting account. ( with the exception that I don’t know the ultimate destination of the content server).
Server Installation
Thanks to my MSDN license, I have a renewing $150 / month credit on Microsoft Azure. It is a fantastic promotion. I configured a modest A2 virtual machine (VM) (Microsoft Windows Server 2012, 2 cores, 3.5 GB memory, 126 GB local disk). Thus far it has cost me about $1 of credit per day.
Once the server was up-and-running, I had to install the tools of the trade. This is a bare-bones server, after all.
| Program | Purpose | Installation Method |
|---|---|---|
| TeamCity | Continuous Integration/Delivery (task runner) | msi download from JetBrains |
| Chocolatey | Windows application package manager, for installing Windows apps (makes installs very convenient and command-line driven. | Run the powershell script at chocolatey.org. |
| Visual Studio 2013 Community Edition | Provides msbuild.exe and mstest.exe, critical for .NET compilation and testing. | Microsoft Web Platform Installer |
| Web Deploy 3.5 | For pushing web site files out to remote servers through a command line interface. | Microsoft Web Platform Installer |
| NuGet | I had already installed NuGet for third party .NET package downloads before realizing that I needed Visual Studio 2013 for mstest.exe, so this was probably unneccesary as a stand-alone install. | ```bash > choco install nuget.commandline ``` |
| NotePad++ | Because at some point you'll want a text editor that is better than notepad, and this one is my long-time favorite freeware replacement. | `> choco install notepadplusplus` |
| Node.js | In this case, my real aim is to get the Node Package Manager (NPM), which will be useful for the web site content, as you'll see below. | `> choco install nodejs` |
| Grunt | JavaScript task runner, for automating tasks such as concatenating and minifying JavaScript (JS) and Cascading Style Sheet (CSS) files. |
`> npm install grunt` `> npm install grunt-cli` |
| Bower | Yet another package manager, this time for JavaScript packages. Similar to NuGet or NPM, but targeted specifically to retrieving client-side JavaScript libraries. |
`> npm install bower` `> npm install grunt-bower-install` |
- for Grunt and Bower, the install needs to be both global and in the website’s working directory. Thus issue the command once with the -g flag for global. Find TeamCity’s working directory for the website project, and open the command prompt there. Run the commands as shown above, without -g, to install locally. All other bower packages that I used on my development computer are downloaded as needed by grunt-bower-install. I also had to manually run the following once in the working directory, before getting Grunt working in TeamCity:
> npm install
> grunt
Time is in short supply, so this has been hastily written. More project configuration details to follow in a second post.
Posted with : Tech, General Programming, DevOps Tools and Practices