Windows Communication Foundation (WCF) is a great tool for building client/server applications in the .Net environment. It is one of those technologies that can be challenging to dig into when services are just one of many tools needed to assemble a business application, as opposed to being an end in itself. With some of my co-workers in mind, here are some of the lessons I have learned in using WCF for internal, line-of-business, applications. These notes, which will be published in several parts, assume a basic understanding of WCF and contracts.
Self-Hosting
WCF is the .Net component for “web services;” naturally the default mechanism of hosting a service is through the web server. While this can be easy to install, it does require that you can install and configure IIS on the server machine. If you have no other needs for a web server, or want the advantages of bindings other than HTTP, then self-hosting is a better option.
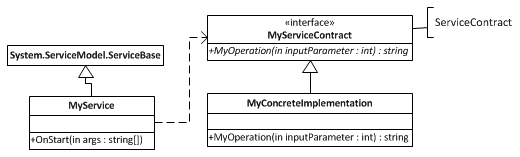
In this model, the developer typically builds a Windows service that provides the host. Client applications connect to a URL just as they do for a “hosted” (IIS) solution. The Windows service must create an instance of the ServiceContract class, and inject that into a ServiceHost. The following code assumes that the service’s endpoint (URL), binding, and behavior are setup in the application’s config file (note).
public partial class MyService : ServiceBase
{
   // be sure to close this in the Dispose() method, which will be in the MyService.Designer.cs file
   protected ServiceHost ServiceHost { get; set; }

   public MyService()
   {
      InitializeComponent();
   }

   protected override void OnStart(string[] args)
   {
      ServiceHost = new ServiceHost(typeof(MyService));
      ServiceHost.Open();
   }

   protected override void OnStop()
   {
      closeService();
   }

   private void closeService()
   {
      if (ServiceHost != null)
      {
         if (ServiceHost.State == (CommunicationState.Opened ^ CommunicationState.Opening))
         {
            ServiceHost.Close();
         }
      }
   }
}
Threaded Startup
When Windows starts up a service, it only gives 30 seconds to the service’s
OnStart command. This is a synchronous method, and if no response is received in
that window, then the service times out. There is a method on the ServiceBase,
RequestAdditionalTime,
that can be used to extend beyond that timeout – but the timeout is there
for a reason. Assuming that your service starts when the server starts, it is
best to let the OS get on with the business of starting up without having to sit
around waiting for your service to finish starting.
Therefore, start the service via a thread. Don’t Wait() for the thread to
complete; just let it do its own thing. I like to use the Task Parallel
Library
instead of the Thread class.
protected object threadLock = new object();

protected override void OnStart(string[] args)
{
   Task.Run(() =>
      {
         lock (threadLock)
         {
            ServiceHost = new ServiceHost(typeof(MyService));
            ServiceHost.Open();
         }
      });
}
Development Debugging
Windows services are difficult to debug; you can’t start the Service from Visual
Studio using the “Start Debugging” command. The simplest way to debug a WCF
service is to run it in a console instead of as a service. When using the
default Visual Studio template for a Windows Service Application, you get a
Main() function like this:
static void Main()
{
   ServiceBase[] ServicesToRun;
   ServicesToRun = new ServiceBase[]
   {
      new MyService()
   };
   ServiceBase.Run(ServicesToRun);
}
Use compiler
directives
to change this so that the program runs as a stand-alone application from Visual
Studio when in Debug mode, but remains a Windows service when compiled in
Release mode. Refactor the OnStart method so that it calls a public Start
method, which itself can be called from the static Main() method. I will also
clean up that default code a little bit…
        var myService = new MyService();
#if DEBUG
        myService.Start();
        Console.WriteLine("Press any key to close down the service");
        Console.Read();
#else
        ServiceBase[] ServicesToRun = new ServiceBase[] { myService };
        ServiceBase.Run(ServicesToRun);
#endif
Installing the Service
There are two ways to install the service:
- Add an Installer class per the instructions in Tutorial: Create a Windows service app, or
- Build an MSI using the WiX Toolset (StackOverflow post on Installing a service using WiX)
The first option is simple and therefore inappropriate in many cases. Building an MSI allows you to
- Bundle dependent DLL’s together to make sure nothing is left out;
- Avoid asking someone to pull up a command-prompt and get the right .Net Framework path for InstallUtil.exe;
- Prompt the installer to enter a service account name and password, instead of making them open the Service Manager and manually enter those values as an additional step (note)
- Perhaps provide options, such as installing with a Test-environment config file instead of the default config file geared toward the Production environment.
None of these advantages are strictly necessary; you could do them all manually. But manual steps are prone to error and frustration. So building an MSI package is a manifestation of the Be Kind admonition.
Run-time Debugging
As with any other application, presumably the service also has some logging mechanism built in. But sometimes the basic logging is not enough — you’ll need to know if applications are actually managing to call the service, the order of operation calls, and which calls generated errors / faults. It is trivial to enable logging a substantial amount of event log data; in fact, it is very easy to accidentally log an overwhelming amount of data.
This logging is configured via the system.diagnostics
node
in the application’s config file. The default configuration provided by
Microsoft includes two types of events: Information and ActivityTracing. I find
that “Information” provides far too much data, unless perhaps I am tuning for
performance. As a commenter in the link above notes, be sure that the account
running your service has write access to the directory that you configure for
the log file. For error debugging, turn on the Warning, Error, and Critical
switches. Again, this is configurable via the Microsoft Service Configuration
Editor; however, it only allows you to configure one switch for the trace
source, so I had to manually add the ,Error,Critical. If that is still too
much information, turn off Warnings and ActivityTracing. The generated file can
be opened by the developer using the Service Trace Viewer
Tool.
<system.diagnostics>
    <sources>
          <source propagateActivity="true" name="System.ServiceModel" switchValue="Warning,Error,Critical,ActivityTracing">
                <listeners>
                      <add type="System.Diagnostics.DefaultTraceListener" name="Default">
                          <filter type="" />
                      </add>
                </listeners>
          </source>
    </sources>
    <sharedListeners>
          <add initializeData="C:\Logs\MyService.svclog" type="System.Diagnostics.XmlWriterTraceListener, System, Version=4.0.0.0, Culture=neutral, PublicKeyToken=b77a5c561934e089"
                name="NewListener" traceOutputOptions="LogicalOperationStack, DateTime, Timestamp, ProcessId, ThreadId, Callstack">
              <filter type="" />
          </add>
    </sharedListeners>
</system.diagnostics>
Logging takes a bit of a toll on performance, so I recommend commenting out this whole section of the config file unless and until you need it. Since this is a Windows service, don’t forget to stop and re-start the service after making a change to the installed config file.
Preview of the Next Parts
In two follow-ups to this note, I plan to discuss:
- Shared Concerns
- Security
- Binding
- Faults and Exceptions
- Dependency Injection
- Shared Library
- Client Side
- Custom Service Client / Proxy
- Channel Caching
- Using Statement
- General References
Posted with : Tech, General Programming, Microsoft .NET Framework